If you want to propagate your orchid at home, but you don’t know how to do it, don’t worry! In this complete guide, we will explain clearly and simply how to propagate an orchid at home. So that you can get the most out of your orchids.
The care of orchids requires certain measures that are indispensable to achieve good flowering and have a healthy plant. For this reason, it is important to know how to propagate an orchid using the appropriate techniques that we will show you in the following content.
Table of Contents
Orchid Propagation Method
First, we will explain how the process of orchid propagation takes place in nature:
Orchids in nature, propagate sexually but how is this? Very simple, since orchids are plants that grow mostly on trees, in the bark of the same there is a kind of fungus. This fungus is indispensable to carry out the process of symbiosis.
These flowers are attracted by a series of insects, which are in charge of transferring the pollen to the stigma of the flower, which corresponds to the gynoecium that receives the pollen. When all this process is done, in the sexual organ of the orchid. It will produce a bulge giving rise to a large number of seeds. Which using the air or fall, will come into contact with the fungus mutually benefiting each other for their vital development.
But as in this case, the orchids are not in their natural habitat. We must help it to propagate, this can be done asexually. But how to propagate an orchid, process involves the use of Keikis, coming from the main orchid, that is, the mother orchid. Later we will explain specifically, how to perform asexual reproduction using Keikis.
How to Propagate an Orchid from The Flowering Stem or Flower Stalk (Keikis)
The asexual reproduction of orchids, using the stem or flower stem is one of the most used methods by orchid lovers. Below, we will explain how this process is carried out:
Keikis are produced after the orchids bloom and are manifested on the flowering stem of the mother orchid. How to propagate an orchid by the flowering stem, the Keikis are produced naturally and when we obtain them it is the right moment to make a replica of the orchid we have at home.
Although in case we want to make the replica, the small plant is not yet appreciated in the flowering stem. You can stimulate the plant for the growth of the same. This is done after flowering, the flowering stem should be cut, but above the node. So that in this way it is left in the air and begins to grow roots and Keikis. This also has a great influence on the care we take of the plant.
For the propagation of orchids using Keikis, the following should be taken into account: It is not advisable to plant the Keikis in another container. Since it will not be apt to carry out the process of development, it is necessary to wait until it is totally strong.
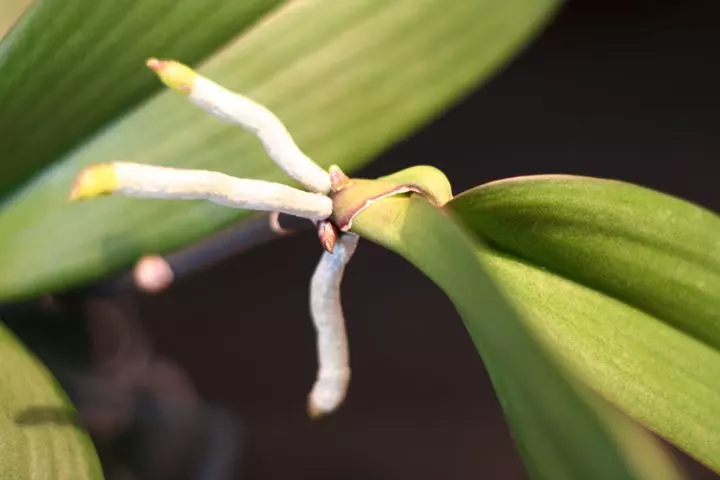
What are Keikis?
In gardening, the term Keikis is used to designate a small plant, which originates from the main plant. That is, the Keikis in this case of the orchid are the babies derived from the orchid. This is emitted after flowering, on the flowering stem. The keikis will behave as a replica of the mother plant, thus obtaining the same characteristics and even in flowering.
For each species of orchid, the keikis will be different. Therefore, it is important to have previous knowledge before propagating it. This method of asexual reproduction is one of the most used and simple to obtain orchids from home.
How to Get and Plant an Orchid Keiki
Now that you know what a Keiki is, it’s time to learn how to get an orchid Keiki and how it should be planted. So that it can grow correctly and originate that desired orchid at home:
As mentioned above Keikis are generated naturally after the orchid blooms, this may occur once or twice a year. To have a successful flowering and thus obtain a Keiki, you mustn’t forget the care you need for the plant: from indirect lighting, use of orchid fertilizer, humidity, and proper watering of the same. If your plant is healthy, you will certainly get the best orchid babies on the flowering stem.
If after flowering, you still do not get Keikis, you can cut the flowering stem as explained above and help the appearance and growth of the Keikis. To plant the Keikis from the mother orchid, you must perform the following steps:
1- First, we must make sure that the Keikis meets several standards to be repotting it: it must have at least three accompanying roots of about 1.2″ (3 cm) approximately and it must have 3 adult leaves. This will ensure that repotting it will be a success.
2- After verifying this, it is time to cut the Keikis, how should we do it? With sterilized scissors to avoid contagion and damage to the plant, we will cut the root and knot of the Keikis. This is the correct way to do it.
3- Subsequently, it should be repotted into a separate pot. Although it is advisable to let the Keikis grow where the mother orchid is located. So that it takes care of the correct supply of nutrients that the Keikis will need, until it can survive on its own.
4- It is important to keep in mind that the Keikis should be placed in a place where it receives enough light and humidity for it to grow healthy.
How to Propagate an Orchid by Cuttings
Another way to propagate orchid is through orchid cuttings. But what are cuttings? They are fragments of the plant used for the reproduction of the same, this is another type of asexual reproduction of vegetative propagation.
Propagation by cuttings of orchids is considered one of the easiest and most effective methods to achieve correct propagation. There are several types of cuttings: from buds that occur in spring and are obtained from certain cuts in the plant buds. Also, cuttings from tender branches by cutting the ends of the plants and cuttings that are cut in late summer, when the stems are thick and strong.
Orchid cuttings can be obtained from some pruning we do to make the most of it. If you are interested in this method of reproduction to obtain clones of the mother orchid but do not know how to do it. In the following guide, we will explain step by step, how to propagate orchids using cuttings and determine if this is the method you like best.
How to Propagate Orchids by Cuttings Step by Step
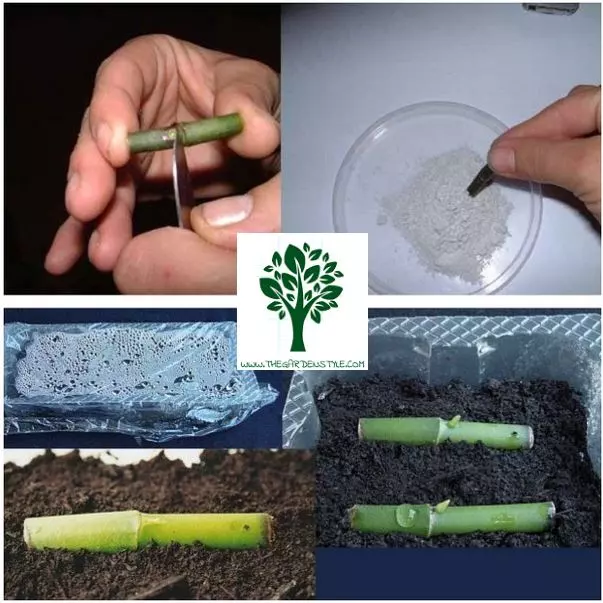
To propagate an orchid by cuttings we must follow the following steps:
1- First of all, you must look for the material that we are going to use to make the cutting. In this case, we will need a more or less deep tray and moss to fill it.
2- Next, with the garden scissors already sterilized we will proceed to cut the stem of the orchid. This should be about 12″ (30 cm) approximately so that we can divide it into several sections. The sections that we cut must have a recent bud of the plant (Garden Scissors Order it here).
3- Later, after placing the moss in the tray we will have to get it until it is humid. In this way, we can proceed to place the cuttings that we have made. The container should be covered and placed in a place where direct sunlight does not reach them.
4- They will be left there for approximately two and a half weeks. Then, they will be moved to increase the temperature of the cuttings. It is important to water them frequently so that they do not lose humidity and grow perfectly.
5- Fertilizers should be used to contribute to their development, this will be done in the first months. If any of the cuttings have been damaged, it is important to remove them, as this could affect the others, damaging the reproduction.
6- When you observe that roots and new shoots have developed, it is time to make a small cut between the stems, separating them. Find a pot to place the new plants in, on a mossy surface.
7- Be sure to use the best substrate, as their growth depends on this. It is important to keep in mind that the sprouts should always be placed upwards. Learn more about Best Soil for Orchids.
8- Locate them in a place where they have lighting and the indicated temperature. Remember to water the small orchids, you can do it about twice a week. Take care to monitor the substrate to know if they are lacking water or if you are drowning them.
9- Use the best orchid fertilizer and that’s it. If everything goes well, they will start to develop perfectly. Learn more about How to Fertilize Orchids.

How to Propagate an Orchid by Pseudobulbs or Division
Surely you have heard about the propagation of orchids utilizing bulbs. But what are bulbs?
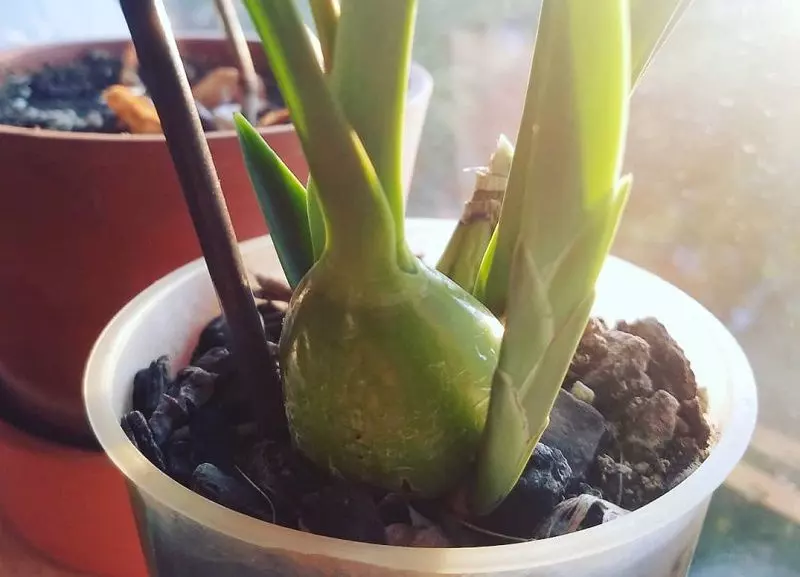
Bulbs are called a plant organ that is formed through a rounded shoot and in whose leaves accumulate reserves, that is, in it, several nutrients are stored. This is a form of asexual reproduction used by plants.
In this propagation process, the plant shrinks, giving rise to a bulb, and then re-emerges through it. Generally, this process is carried out when the orchid is already several years old and is considered to be very large. Therefore, what we must do is to divide it into two or more plants to be able to propagate them.
Propagating Orchids by Division Step by Step
Here are the steps to follow to propagate orchids by bulbs or division:
1- First of all, the division of the plant must be done. Then we must take the orchid out of the pot to check the state of its roots. It is important to examine the color of the roots and see if they are healthy to start with reproduction.
2- Next, we must separate the plant into two parts. This should be done from the base to avoid any damage. This is when we will check if the bulbs are found. It is important to keep in mind that to obtain the next flowering and good development, each plant should be divided into 3 bulbs. This is a rule to ensure the success of this method.
3- In addition, both should have a new shoot. Then, the roots that join the plants should be carefully cut and the roots that are rotten or dry should also be eliminated since they will not be beneficial.
4- Afterwards, pieces of bark should be placed in both pots. The new sprout must remain in the center of the pot. Also, make sure that the orchid is completely secure when placed in the pot (Order Bark for Orchids).
5- As the last step, the plants should be soaked for about an hour and a half. After this, it is not recommended to water them frequently and they should be placed in a place where there is not enough light.
Propagate Orchids Phalaenopsis
The most used species and that most people look for are:
The Phalaenopsis called butterfly orchid, which is characterized by having striking colors, 3-leaf blooms, and being more than 60 species. And the Cymbidium was known by many as the boat orchid, which is a genus with approximately 52 species, with long and large spikes where the flowers are appreciated.
They are considered to be one of the most sought after because they are easy to grow and the artificial flowering process can be well managed in our homes. But how is the reproduction of both species?
In case you don’t know how to propagate Phalaenopsis orchids or how to propagate Cymbidium orchids you simply have to carry out one of the methods explained above. For the Phalaenopsis orchid, you can use the asexual reproduction process of Keikis or sexual reproduction and in the case of the Cymbidium orchid with the bulb or division method.
Regardless of the method you use, you will be able to propagate your orchids successfully at home. Follow all the steps and care mentioned in each process. And choose the method with which you feel more confident.
Finally, I hope this content on how to propagate an orchid at home has been of great help to you. Learn more about How to Repot Orchid and How to Get an Orchid Bloom Again.